
Remember this outfit? It’s what I wore when I stepped down from being Principal Herald and I love it still.
Except it’s not blingy enough for my liking.
So, enter Project Disco Ball.
Bezants are little metal bits that are sewn to clothing. They’re also called paillettes, but the main idea are bits of metal with embossed designs on them. They were used as dress ornamentation as early as Ancient Greece and as late as Elizabethan England (see also spangles), so there’s a nice range in time in which using little metal bits could be used in customizing and making your pieces fun and sparkly. Many of the documented bezants on clothing date from the 14th and 15th centuries, (though, check out this 11th c burse and these 12th c bezants!) Anyhow, this article from the West Kingdom goes into some details about how and why these bits of bling were used.
Back to Project Disco Ball.
So, as much as I love my 11th c delmatikion, it’s still quite a bit plain. However, after stumbling onto these Bulgarian beauties (with a minor complaint of not knowing how old the bezants are! grr. original link here – more on these photos can be found here), I wanted to augment my Byzantine with metal.
Here’s the process I’m using. It’s not period as far as I can tell, as most of the bezants I’ve seen are stamped, however, my carving skills don’t exist, and these are the tools I have on hand. If you have stamping tools, try them out. Let me know how they work for you!
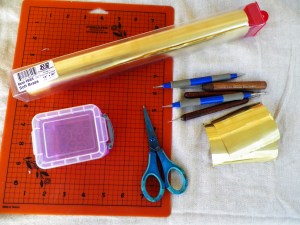
Things you will need:
Sheet brass at either 36 or 44 gauge (I picked this up from my local art supply store and chose the .005 thickness. Blick carries this, but you may need to special order it. I paid about $13 for it this year, but this is also depending on metal prices.)
Embossing ball tools
Needle tool or awl
Files
Scissors (I feel like I have to say to not use your good fabric scissors for this project, but yeah, don’t use them.)
Cutting mat or leather padding
Optional, but helpful:
Stamps (try stamps meant for leather if you’re not good at freehanding shapes – warning – this can get expensive)
Hammer (for stamping instead of drawing on the metal)
Stamping machine, like a Sizzix (if you have this and the right dies, you can get some really interesting and pretty close to period embossed shapes, but this is expensive)
A small plastic container (for holding onto your finished bezants while you work on them)
To start, cut down your brass sheet into manageable pieces. If you look at the photo above, the sheet I purchased comes in rolls of 12″ by 30″. After you’ve cut out your sheet into smaller pieces, decide if you’re going to stamp or draw your outlines with your embossing tools. If you’re stamping, you’ll skip past most of the instructions. If you’re drawing, keep following along.
 After cutting your metal, start drawing your design with your embossing ball tools. Do make sure you’ve got a protective surface down – my first bezants were made on an MDF block, but I prefer the give of my cutting mat more. You’ll get these really simplistic shapes without too much detail, but I promise that more detail will come later. I find that using a smaller embossing tool makes it easier on this step and will give you finer lines, however, having a variety of sizes will come in handy later. You can see the difference between the outlines (left) and a mostly finished bezant (right) in the dimension and texture of the piece in the photo to the right. You will want the texture and dimension. Promise.
 After starting your outlines, flip the sheet over and consider using a slightly larger embossing tool at this point. Go over the parts where you want to stick out with the tool. In this case, I went over the interior of the wings because I wanted those to show up more. One thing to remember – you will have a front and a back. Once you decide which is the front and which is the back, stay consistent, as you run the risk of confusing yourself. As you can see in this photo
  to the left, the embossing adds quite a bit of dimension, however, one of the downsides is overworking the metal, which leads to warping. I have found that the maximum size I can work and not warp the metal is about 2 inches across. Your mileage may vary.
Once you’re done with embossing all of the details on this side, flip the sheet back and start embossing around the parts that are not already showing dimension. This pushes the design out a bit more – makes it pop, if you will.
If you’re stamping your design, welcome back. This is the easier of the two, but the more expensive, as individual stamps cost money, and finding them in the designs and sizes you want may be difficult. Anyhow, when stamping, place your metal sheet above your cutting sheet/thick leather padding and below your die. You’ll then take your hammer and evenly and directly hammer the sheet. Tada! You have bezants on a sheet!
 Now that’s done, you’ll want to cut out your design. Of course, don’t use your good scissors on this, as you are cutting something literally made of metal. It will dull your scissor blades eventually. If you’re stamping, try hammering harder to create a cut. This, of course, does run the risk of dulling your stamp, however, you will end up with a much smoother piece. If you’re using scissors, it is harder to prevent smaller sharp bits, so consider lightly filing the bezants so that they don’t grab the fabric and pull on it.
After cutting out your bezants, you’ll want to punch out holes so that it can be sewn on. This is where I like having a self-healing cutting mat. Even though the metal is 44 gauge and very thin (it’s like having a slightly heavier heavy-duty aluminum foil except brass), it still has enough thickness that punching holes can be tiring.
 To do this safely, put your mat down first, then the metal, then line up your needle tool. Press down evenly and gently, and then you’ll have a hole. Flip your bezant over and punch where the holes are again. This does two things: smooths the hole and increases the size. Nothing sucks more than making bezants and finding that your needle is too big.
Really, you can do this prior to cutting out or after. I prefer punching the holes before cutting out the bezants, but you may prefer cutting out the bezants first and then punching the holes second. This is up to you. If you have a hole punch, you could use this, however, I find that most commercial hole punches are too big for the bezants I’m making.
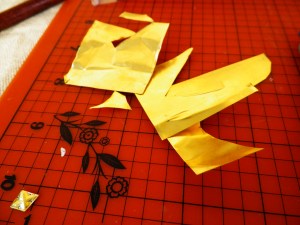
Pro tip: save your bits of cut out brass from larger pieces. As you can see, after cutting out the super tiny bezant (look down in the corner), there’s still a lot of left over brass. Save this for later projects in a plastic container. Depending on the size of your bezants, there’s plenty to keep using and you’re not wasting metal. I’ve kept these bits for later use, as I don’t want them to go to waste, and there’s still plenty of usable space.
 And now? Tada! You have completed bezants now! Sew them onto your clothing!
Caveat: cleaning and caring for your clothing has now become more expensive. I do not recommend throwing this into the wash. While brass puts up with a lot more abuse thank aluminum or copper, it is still soft enough to deform in a washing machine. Brass will also patina over time whereas gold (the period and clearly more expensive option) would not. I have a local dry cleaner that handles a lot of special event clothing (wedding dresses and the like) and I take all of my beaded, silk, and special fabric garb to them. By entrusting your garb to professionals, you could be wearing your clothing longer, especially if you’ve got a lot of beading or baubles. Of course, the other option is hand-washing, which, of course, is more period, but of course, more time consuming.
If you’ve got questions about making your own bezants, feel free to ask! I’ll be glad to answer your questions!

The 12th C example is a reposted image from Bildindex, with an internal caption that says 14.-15.Jh, aka 14th to 15th C. I’m not sure why the flickr poster listed it as 12th C. Perhaps she had some additional information, or perhaps it was a typo.
LikeLike
Ah ha! The reason the flickr link says 12th C is that Bildindex had captions that were updated.
http://www.bildindex.de/document/obj20635237
and also http://www.bildindex.de/document/obj20635236
Searches: http://www.bildindex.de/ete?action=queryupdate&desc=Brakteaten&index=obj-all
http://www.bildindex.de/ete?action=queryupdate&desc=brakteatenfibel%20&index=obj-all
Also a direct link to the other 10th C item – http://objektkatalog.gnm.de/objekt/KG562
LikeLike
There we go! That works!
LikeLike