I’ve written in the last entry that Calontir is in a Norse reign, and as a result of that, I got to do some research in bits and pieces for Her Majesty Ylva to give as tokens. As I can’t make all of them myself, this entry will serve as a way for those who would like to help to learn to make them, or is a great way to improve your Norse kit by making a bit more bling.
 Speaking of bling, and is a bit offhandedly here, but the first comment I got from wearing my new Norse kit last weekend at Coronation was “Oh my gosh, you’ve Byzantine’d your Norse,” which amuses me to no end, because I suppose I am a bit of a Byzantine peacock, and there’s nothing wrong with blinging one out – add to your more period atmosphere: wear bling! It’s a great way to look more like one has stepped out of a longhouse.
Back to the tutorial.
First, the things you’ll need.
Supplies:
Wire (I’ve had the best luck with 20-24 gauge coloured copper wire in either silver or gold)
Flat-nose and round-nose pliers
Wire cutters
Beads (more on this later)
Optional: Jumprings (4mm-6mm seem to work the best)


To start, these are primarily worn by Norse women on treasure necklaces and festoons. The Viking Answer Lady has a great article on beads found in the area, as well as what they were used for, as well as demonstrating how they fit on a festoon, and the types of glass. Additionally, please check out the numerous examples of Norse bling on my Pinterest page for this reign for some inspiration for beads, materials, and appearances.
 More about beads: What I’ve found being used varies. I’ve found quartz, metal, foiled glass (with foil encapsulated in the bead), carnelian, coral, and others, all about 8 mm or larger (the largest bead I’ve used is about 20mm in diameter), and of various sizes and shapes. For inspiration, please feel free to look at the featured photo, or this photo. There is some variance, as I’ve included sunstone (not really known to this period or location, but the cut was right and it looks cool) and well as amber resin beads. If you’re purchasing supplies to make your own, simple facets are period – hex cut, melon beads (not cut, but moulded into shape if glass), and other shapes similar to these look right for the time period/location. There is even a rare version of a festoon using pearls (which makes my very Byzantine self very happy!) One of my favourite shapes that I use is called a crow bead, and are made of glass or bone (these are similar to children’s plastic beads, also called pony beads) and is a fairly common shape (and nice on the budget).
Additionally, Fire Mountain Gems has a line called Deepak’s Gem Palace, which are hand-cut gemstones and often have simple facets. I am also amused by these ridiculously small glass beads that also date from the period Their Majesties are portraying, however, I’m not seeing them attached to anything, so I would caution against using seed or E beads for this project.
This project will also show how to make two types of rings: one is a simple round with beads, the other is a frying pan shape made with the wire.
Both types of rings start the same way.

Instructions:
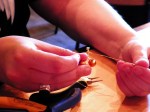
Start by cutting a piece of wire long enough to place the bead(s) on, twist into a circle, and to wrap around itself with the least amount of wasted wire. I’ve found that this is usually about 3 1/2 inches or so, but experiment and see what works for you. With this particular (large) lampwork bead, I opted for a piece of 20 gauge wire that would allow the bead to move freely, but wasn’t too large – it was about 3 inches and I felt it worked well. For the frying pan shape, you will need a bit more wire – 4 inches usually worked well for this.
Once you have your wire cut, put your bead(s) on. With the circular, I’ve primarily seen singular beads used in period, though, I’ve found one with a bunch of different beads on it, so feel free to mix and match beads as you wish. For the frying pan shape, there’s a bit more out there. I’ve seen singular beads, multiple beads, and even an example using multiple beads with small rings in between the beads. If you’re wanting to make one with the small rings, consider using commercial jumprings 4mm-6mm in size – big enough to not get caught in the beads, but small enough to not be the main focus of the ring.
At this point, decide what kind of piece you’ll make, as it will determine your next steps.
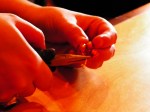
For the circular piece, cross the wires and wrap these bits around the ring itself, creating a self-contained ring. You will have a few sticky-out parts, and you’ll need to use your wire cutters to cut those down. To help keep the bead(s) out of the way while you’re working on the twisting, I usually palm them as best as I can and then twist that wire around itself. It usually works well enough to make the process a little faster.
 Try to cut the sticky-up wires down as close to the ring as possible to avoid future snags and to make it easier to smash the wires down. You’ll also need to flatten down the edges with your flat-nose pliers after cutting the excess away, as these little sticky-out bits will get caught on hair, clothing fibres, or other bits of other festoons and can be quite pokey if you’re not careful.
 To make the frying pan piece, put all of your beads (with or without jumprings) on the wire, and cross the wires. The difference here is that instead of wrapping around the ring, you will need to wrap the excess wire away from the ring. I went about an inch away, however, this is personal preference. Most in this shape do not have wires that stick out too much past the ring, stopping at most an inch or so.
 After the twist has been made, now the bail needs to be made. This is accomplished by creating a tight spring shape with the individual wires and wrapping it around a set of round nose pliers, doing your best to keep it around the same size. This will need to be done to both wires (though there are a few in this shape that only have a short spring using one wire, but this is the easiest method I’ve found). Once you’ve created this spring, take your excess wires, and wrap them back around the twist, cutting and flattening them back down once you get to the main circle.


I hope this makes sense, and I do hope your attempts at making basic Norse bling go well. If you’re in Calontir, I want to see what you’ve made, and if you’re outside my kingdom, please feel free to post what you’ve made! I can’t wait to see how you’re improving your kit!

Thanks for a great post! I’ve since made a few batches too. They’re quick to make, and it’s a great way to use odd beads left over from other projects. I also like that by period sources, it’s ok for them to be a bit rough, asymmetrical, or imperfect. As one who can see when her embroidery stitches are a thread off (I do blackwork – precision is part of the art), the freedom and “discipline” to let the charms be more organic looking is a healthy stretch outside my standard zone.
LikeLike
Thank you! I’m glad you like making them and that this worked out for you!
LikeLike
Pingback: Norse Pärlhänge – bead pendants – Eleanor Deyeson's Workshop